Tuesday, December 20, 2011

Christmas Craft

In many Catholic traditions, Epiphany (January 6th), symbolizes the last day for Christmas celebrations. Epiphany Eve (January 5th), in the Italian culture, "La Befana" goes out to visit the children of Italy. In this folklore, the Befana is a witch-like lady who fills the socks of good boys and girls with candy and gifts (usually chocolate, nuts and oranges). It's a cute little tradition that is very similar to the gift giving of the more familiar Santa Claus.

Given that the Christmas celebrations are still being held in some cultures, there is rather simple and crafty idea that you can do during this time. It has turned out to be a holiday tradition in my home.


The sight and smell of certain foods can conjure up memories of times past. For me, there are particular smells that remind me of the winter holiday season.

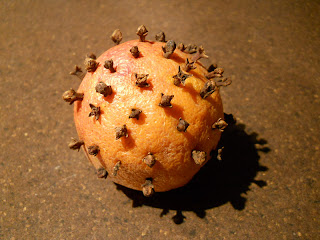
Begin with an ordinary orange.


You will also require a handful of cloves. Pierce the orange with the cloves all the way around the surface of the fruit. (You can also get craftier by creating patterns around the orange.)

The orange and cloves together will create a natural air freshener which will leave your home smelling spicy and warm.

Also, don't worry about the orange going bad. The cloves will actually petrify the fruit and turn it into a hard ball.

Marroni

Every Christmas, I do a load of baking. One of my specialties is a cookie I like to call marroni (chestnut cookies). This is the third recipe in my series of gluten-free and dairy-free nut cookies. (To view my previous recipe for amaretti, click here and to view my recipe for pecan pie cookies, click here.)

Chestnut flour can now be readily found in specialty supermarkets and in bulk food stores. It imparts a wonderful flavour, reminding me of winter time.

For this recipe you will need 1 cup of chestnut flour, 1 cup blanched ground almonds and 1 cup of white sugar.

 
Mix the dry ingredients together.

For the wet ingredients, you will need to start with the whites of four eggs (8 tablespoons of egg whites). I said "start", because the chestnut flour can be a little temperamental, depending on its moisture content.
 
Whip the whites to stiff peaks.


At this point, blend in 1 teaspoon of vanilla extract.

Add the vanilla egg whites to the dry ingredients.

Fold in the egg whites to form a dough. If a dough cannot be formed, because the ingredients are too dry, feel free to add more whipped egg whites. (I have, on some occasions, used up to six egg whites or 12 tablespoons of egg whites.)

Drop teaspoon sized balls onto a greased, aluminum foil-lined baking tray. Be sure to leave approximately 1 inch of space between each cookie.
I liked to top each cookie with a slivered almond.

Bake the cookies in a 350°F oven for approximately 15 minutes. Be sure to let them cool prior to removing them from the baking sheet.

These cookies have a dense, chewy texture. They can be easily made ahead of time and frozen. Marroni are always a hit during the holidays!

Friday, December 16, 2011

Pecan Pie Cookies


Using the basic recipe for amaretti can be a great jumping off point for making other nut cookies. The basic premise is always there: whipped egg whites + sugar + ground nuts = great cookies. (To view my recipe for amaretti click here.)

The second recipe in this series is for pecan pie cookies.

I picked up a package of pecan meal the last time I was in Florida. The Sheffield Pecan Company carries some fantastic pecan products. I would highly recommend them.


You will need 2 cups of pecan meal and 1 cup of golden-brown sugar. I decided to use this type of sugar, because it adds a little bit more flavour than regular white sugar. Brown sugar contains molasses, giving it an enriched taste. (By the way, the darker the brown sugar, the more molasses it contains.)

Mix the dry ingredients together.


You will also require the whites of four eggs (8 tablespoons of egg whites).


Whip the whites to stiff peaks.


Add the egg whites to the dry ingredients.


Fold in the egg whites to form a dough.


Drop teaspoon sized balls onto a greased, aluminum foil-lined baking tray. Be sure to leave approximately 1 inch of space between each cookie.


These cookies don't really need any type of topping. However, I had some candied orange peels in the fridge, so I decided to use them.


Bake the cookies in a 350°F oven for approximately 15 minutes. Be sure to let them cool prior to removing them from the baking sheet.


These light cookies taste like little bites of pecan pie! Also, they are completely gluten and dairy-free.


Amaretti

Christmas is around the corner, so I've started my holiday baking. I like to start early with some nut-based cookies, because of their ability to hold well in the freezer.


This post will be a series of three recipes, all involving nuts of some sort. By the way, all of these cookies are gluten-free and dairy-free (in case you were wondering).


The first type are amaretti, a classic Italian cookie. Traditionally, the nut portion of the ingredients came from the almond-like inner pits of apricots. Nowadays, almonds are used. I have made this recipe with different type of almonds. You can use almond flour, blanched almond meal, ground whole almonds, or even the left over almond mulch from making almond milk (which is what I've used today). (For my recipe for homemade almond milk, click here.)


Whatever type of ground almond you decide to use, you will require 2 cups.


Note: If using almond mulch from almonds that were previously soaked in water, you will yield a thinner and flatter cookie.


To the almond mulch, add 1 cup of sugar.


Next, you will need the whites of four eggs (8 tablespoons egg whites) poured into a mixing bowl.


Whisk the whites until they make stiff peaks.

Now it's time to inject some flavour. I like to add 1 teaspoon of almond extract to the egg whites and give them a quick stir. Believe it or not, that's it for the wet ingredients!

Place your almond extract-infused egg whites on top of your dry mix.


Fold all of the ingredients together, until a dough is formed.


Drop, teaspoon-sized balls onto a greased, aluminum foil-lined baking sheet. Be sure to leave approximately 2 inches of space between each cookie, as the amaretti tend to expand quite a bit when they bake.


I like to add an espresso bean to the center of each cookie. Coffee and almonds are always a good pairing.


Bake the amaretti in a 350°F oven for approximately 15 minutes. Wait for them to cool completely before removing them from the baking sheet.

The end result will be a light and airy cookie with a pleasant roasted coffee surprise.

Ramfal

While at a market in Chinatown today, I was able to find some Ramfal. After reading my blog entry about Sitafal, you will know that Ramfal is it's "counterpart" fruit. (To read my entry on Sitafal, click here.) This fruit may also be known as "soursop" or "guanabana".

It is a larger fruit compared to the Sitafal; this one being approximately twice the size. As you can see, the outer skin is somewhat different, in that it is not compartmentalized. The outer layer is also smoother and shinier than the one of the Sitafal.


Getting to the inside of this fruit is also much easier. It simply needs to be cut in half.


Once cut, the fruit can be eaten right off the skin. The texture is kind of a combination of 'banana meets bread'. In any case, it still has its characteristic custard-like flavour (as does the Sitafal).


This fruit contains many smooth, brown seeds, which are not meant to be eaten.


Ramfal goes very well with mixed drinks, smoothies, yoghurt and ice cream.

Sunday, December 4, 2011

Sitafal

All this cold weather is making me crave exotic fruit. It's probably because my body really wants to be in a tropical climate and not in the Great Cold North.


Next time you are looking for exotic fruit, step away from the mangoes and papayas. Try a Sitafal instead.


I am using the Indian name for this fruit. Sita was the wife of Ram (both being Hindu deities). The name Sitafal literally means "Sita fruit".


In case you were wondering, there is a Ramfal as well. Looking relatively similar, the Sitafal has a bumpier exterior, where her husband has a smoother outside texture.


Sitafal may be otherwise known as a "sweetsop", "sweet-apple" or "custard-apple", among others. This and other apple-suffixed fruit are known all over the English speaking world. To my understanding, the word apple was used, at one point in time, to name newly discovered fruit. Think of a pineapple. It's neither a pine nor an apple, but it somehow works.


In any case, the fruit somewhat resembles an artichoke. (I'm sure the name "artichoke-apple" didn't sound very appetizing.)

When ripe, the fragile and almost crumbly exterior can be removed easily with a little pressure.

Once all of it is removed, the Sitafal will be ready to eat.

The fruit is made up of tiny sections or pockets containing smooth, black seeds. (The seeds are not edible.)


Seeing the fruit in this form, it becomes obvious why some call it a "custard-apple". Each little pocket of fruit has a custard-like quality. It is sweet and milky; an unusual flavour in fruit.


These fruit can be found, somewhat easily, in grocery stores catering to the Asian market in and around the Greater Toronto Area.


Take a good look, because it could be called just about anything! Just make sure to pick one that is a bit soft and has a little give to ensure that it is ready to eat.

Tuesday, November 22, 2011

Kitchen Ergonomics - Part Two


When shopping for kitchen tools, I am sure that you have seen different instruments that have fat/chubby handles.

For those of you who are wondering why large barreled instruments are ergonomic, this is the post for you.

As I discussed the different types of gripping in my previous post, you will recall that using a pinch grip is not exactly the greatest grip to use. (Click here to view my post on Kitchen Ergonomics - Part One.)

In this installment, we will be looking at grip forces. I am generally referring to the pressure on the hands and arms by tools that could result in the compression of tissues. More specifically, a pinch grip involves holding an object between the thumb and one or more fingers. This type of grip exerts a force that cannot be held for very long. That being said, it does not necessarily mean that using a pinch grip is a bad thing to do. It only becomes a problem when the pinch grip is used either repetitively or for prolonged periods of time.

Tools and equipment used in the food industry can contribute to ergonomic hazards. One of the ways an ergonomic hazard is observed is through using tools which require high pinch grip forces. A way to reduce these forces is by using bigger/larger handled tools.

Here's an everyday example; a pen (for writing down all of your recipes). As you can see, when using the pen, a pinch grip force is used. When employing a pinch grip, the body is forced to use tiny muscle groups that fatigue easily. This forces the body to use other muscle groups to compensate. Can you remember a time where you had to write out a large amount of information and by the time you were finished, your arm (and maybe even your shoulder) hurt?
 
Increasing the size of the pen's barrel reduces the pinch grip, in turn, allowing your hand and arm to use larger muscle groups. As you can see, this is done in a number of ways.

Adding a larger grip to the pen may be sufficient.

Using a pen with a larger barrel also works.

When looking for tools, try to stay away from ones that have pre-marked grooves for fingers. These grooves often don't often match up with everyone's specific dimensions and lead can to an uncomfortable fit.

Remember, the goal in ergonomics is for the tool to fit the user and not the other way around.
 
Kitchen Tool Examples: Peelers
Vegetable/fruit peelers are fairly common in the kitchen. As you can see in this example, holding this type of peeler could create a pinch grip.

Clamping is also considered to be a type of pinch grip.

A way to reduce the pinch grip is to increase the size of the barrel of the tool, as seen in the example below:
(It's actually a zester, but you get the point.)

In this next example, you move from using a pinch grip to a power grip (a better way to grip, in 
ergonomic terms):


Another way to look at the grip hazard is by eliminating it altogether. Using a palm-style peeler eliminates the gripping.

The way this peeler is designed allows the user to maintain neutral hand positioning without gripping. (N
eutral hand positioning is when the hand is in line with the wrist and forearm.)


In the world of food ergonomics, fat equals more than just flavour. (At least, it does when you're talking about tools!)